How I use gamma levels for limit orders (a 2R trade at the Put Support)
By Jason · 7 October 2026
On Wednesday I made my best trade so far: +£16.10, about 2R, in 36 minutes.
It wasn’t my usual 1-hour rejection setup. It was a limit order sitting on a gamma level, placed from experience after a big move. Here’s exactly how I did it.
The move: support after support broke
Gold sold off all Wednesday morning, from about 4,149 down to 4,109. Then, in the 13:00 UK hour, it dropped another $55 in one candle.
On the way down it went straight through my support levels:
- 4,111, last week’s double bottom (a strong level)
- 4,097, then 4,082
When levels break like that, one after another, I stop looking for a reversal at each one. The question becomes: where is this move actually heading?
The gamma map answered that.
Where the gamma map said it would stop
Each day I draw gamma levels on my chart, worked out from where big options positions sit on gold (what gamma levels are). Two of them were sitting right under price:
| Gamma level | Price | What it means |
|---|---|---|
| Put Support | 4,073.8 | The strike below price with the most put gamma, often a floor |
| 1D Min | 4,066.8 | The bottom of the day’s expected range, from option prices |
With price falling fast below the zero-gamma line (where moves tend to run further), I expected it to keep going into that area. I also expected a reaction from it.
The trade
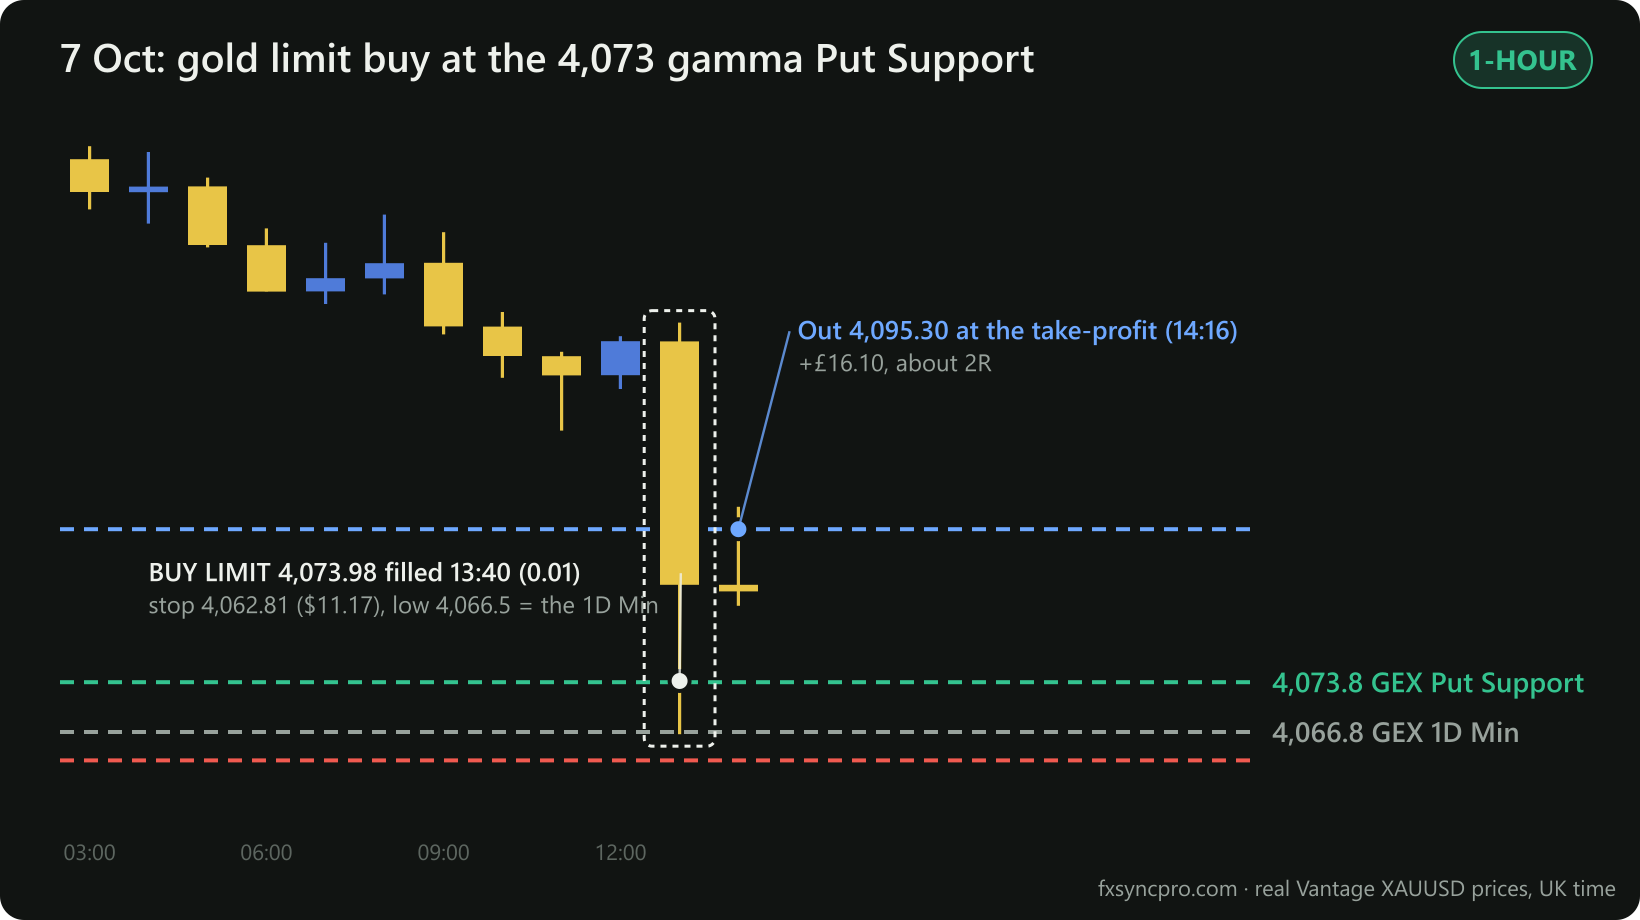 Real Vantage prices. The Put Support was on my chart from 06:30 UK, hours before the move.
- Entry: a buy limit at 4,073.98, right on the Put Support. I didn’t chase it. The order waited for price to come to the level.
- Stop: 4,062.81, under the 1D Min (4,066.8). If price got through the bottom of the expected range as well, I was wrong and I wanted out.
- Target: 2R, 4,095.30.
It filled at 13:40 UK. The low was 4,066.5, 30 cents from the 1D Min. Price bounced straight back, and the take-profit hit at 14:16 UK.
Why a limit order and not my usual entry
My normal strategy waits for a 1-hour candle to close back through a level before I enter (the 1-hour rejection strategy). That’s the right way for normal levels.
But on a fast move into a gamma level, the bounce can be over before the hour closes. Today, by the time the 13:00 candle closed, price was already at 4,087, $13 above my entry. Waiting for the close would have meant a worse price and a much worse risk/reward.
So, when:
- price is moving fast and stretched towards the level,
- the level is a gamma level, ideally with a second one close by (here the Put Support plus the 1D Min),
- and there’s a clear place for the stop beyond both,
I’m happy to let a limit order do the work.
The rules I set myself
- Only at gamma levels I drew before the move. Never a line drawn afterwards.
- The stop goes beyond the second gamma level, not just a few dollars under the first.
- Set the target before the fill. 2R here. No moving it once I’m in.
- I log these separately in my journal as “gamma limit” trades, so I can see how they do over time next to my 1-hour trades.
The honest bit
One trade is one trade. A limit order on a falling market can just as easily fill and keep falling. That’s why the stop sits beyond the 1D Min, and why I risk the same small amount as always.
Every trade, including this one, is in my journal, with the real prices from my account.
Real trade on my own live account at small size. This is how I trade, not financial advice.