Where to put your stop loss on gold: 4 mistakes I made this week
By Jason · 30 September 2026
If you’ve ever been stopped out by a few cents and then watched price go exactly where you said it would, this post is for you. It happened to me this week. Twice.
I trade gold at key levels on a small live account (0.01 lots), and I log every trade in my journal. Looking back at my first eight trades, almost every mistake I made wasn’t the entry. It was the stop. Too tight, in the wrong place, or worked out from the wrong price.
Here are the four stop mistakes I actually made, with the real charts, and the one simple method I use now.
First: what a stop costs at 0.01 lots
On most brokers, 0.01 lots of gold is 1 ounce, so every $1 gold moves is about $1 (roughly 75p) to you. A stop is simply how many dollars away from your entry it sits:
| Stop distance | Loss if hit (0.01 lots) |
|---|---|
| $4 | about £3 |
| $6 | about £4.50 |
| $8 | about £6 |
| $12 | about £9 |
That’s why I keep my stops around $4–8, and skip a trade if the proper stop would be much wider. (More on what 0.01 lots means on gold.)
Mistake 1: putting the stop inside the zone
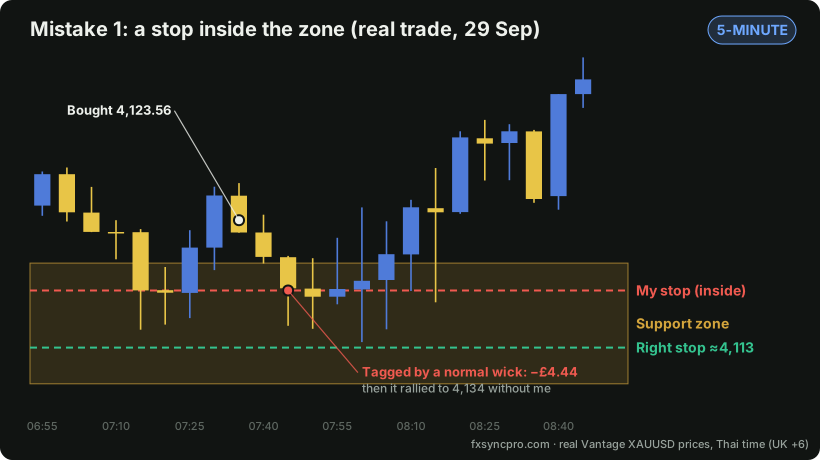 Real trade, 29 September. My stop (red) vs the stop the rules called for (green).
Gold dipped into a strong support zone and bounced. I bought the pullback at 4,123.56 and, to keep the risk small, tucked my stop just under a little 1-minute swing, inside the support zone at 4,117.73.
A support zone isn’t a single price. It’s an area where price wobbles around before deciding. A normal wick into that area took my stop (−£4.44), then gold rallied $20 without me.
The fix: the stop goes beyond the whole idea. For that buy, that meant below the dip’s low (4,114.49) plus a small buffer, about 4,113. That stop would have survived. It was also about $10 away, which was over my limit, so the honest answer was skip the trade, not squeeze the stop.
Never tighten a stop to make a trade fit. If the proper stop is too wide, skip it.
Mistake 2: using the wrong high for the stop
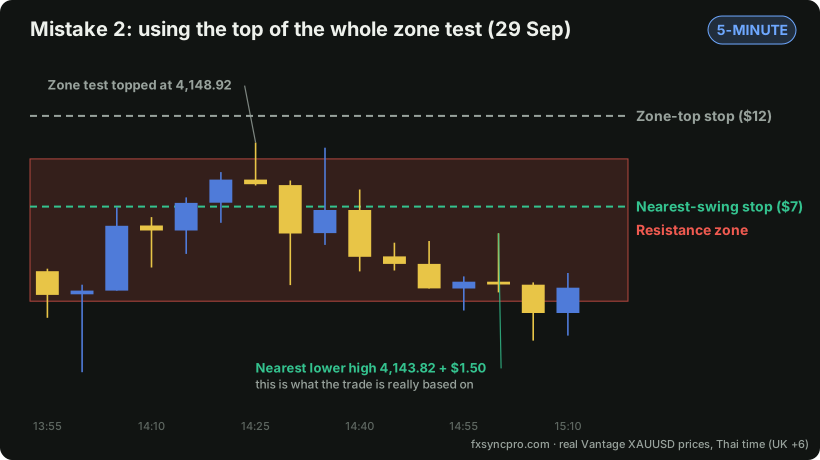 29 September, London. The zone-top stop vs the nearest-swing stop.
The opposite problem. Price spent 40 minutes wandering around inside a resistance zone and topped out at 4,148.92, then started making lower highs. I was looking for a sell, and I put the stop above the very top of the whole zone test. That made it $12 away, so the trade looked “too wide” to take.
But the trade wasn’t based on that top any more. It was based on the nearest lower high (4,143.82), the last point sellers stepped in before the drop. The stop belongs $1.50 above that: $7 of risk.
(That particular setup never gave a clean signal, and price later pushed back above it anyway. A good stop doesn’t make a trade win. It just makes the risk honest.)
The fix: the stop goes $1.50 beyond the nearest swing the trade is based on, not the most extreme point of the whole move.
Mistake 3: working out the risk from the wrong price
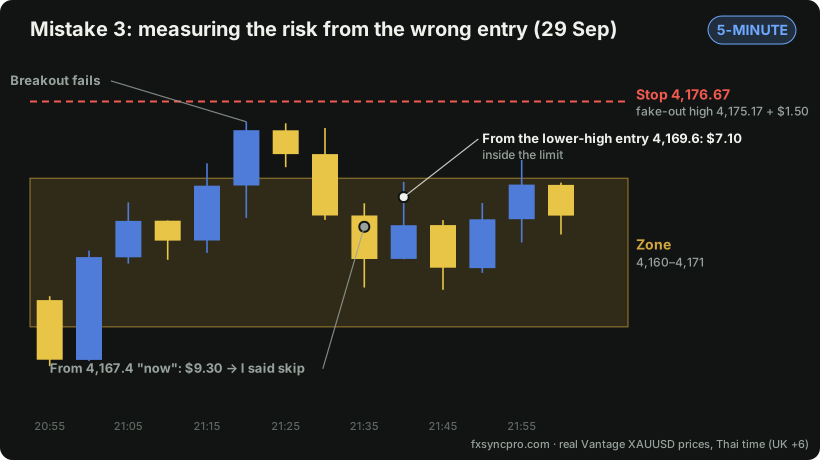 29 September, New York. Same stop, two different entries.
Gold broke out above a zone after the news, failed, and dropped back inside it. That’s a classic failed breakout, and the sell goes on the first lower high back into the zone, with the stop just above the fake-out high.
I looked at it while price was sitting low at 4,167.4, measured the stop from there ($9.30), said “too wide” and skipped it. But that was never the entry. The entry was the bounce: about 4,169.6, where the stop was $7.10, inside the limit.
The fix: always measure the risk from where you plan to get in, not from wherever price happens to be when you look. If price has already moved past your entry, the answer is “wait for the pullback”, not “skip”.
Mistake 4: moving to breakeven too early
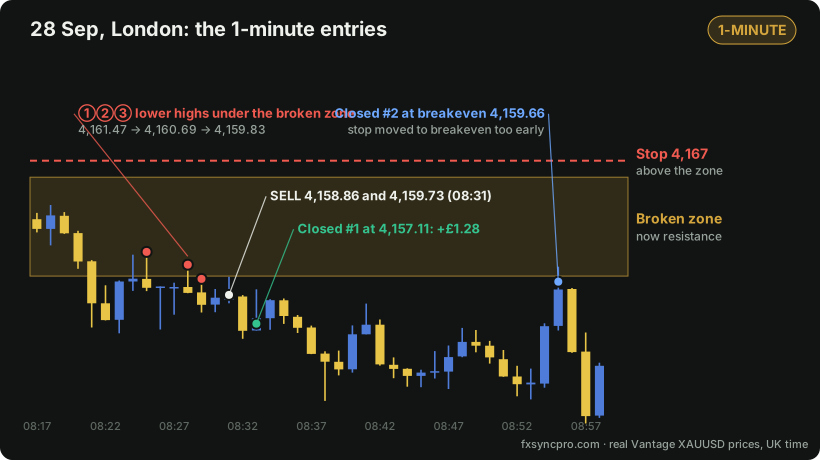 28 September, London. The second sell was tagged at breakeven to the cent.
Moving your stop to breakeven feels like free money. It isn’t always. On 28 September I moved my stop to my exact entry as soon as I was 50 pips in profit. A normal $4 pullback tagged it to the cent, and then gold fell another $6 without me.
The fix: only move to breakeven once price has broken the next swing, and put the stop a dollar or two beyond the last 1-minute lower high (for a sell), not exactly on your entry.
The method I use now
Four mistakes, one simple method:
- Decide the entry first: the 1-minute lower high (sell) or higher low (buy) on the pullback. Not the current price.
- Find the nearest 5-minute swing that the trade is based on: the rejection wick, the retest low, or the fake-out high.
- Stop = that swing plus $1.50 (gold), and never inside the zone or the signal candle.
- Risk = entry minus stop. If it’s over about $8, skip. Never squeeze it.
- Target = the next real level, placed just before it, and at least 1.5× the risk. If not, skip.
- Breakeven only after the next swing breaks, a dollar or two beyond the latest 1-minute swing.
It’s not magic. Some good stops still get hit. But since writing these rules down, every stop I place has a reason, and every loss is the size I planned.
Follow along
Every trade I take, including the losses and the trades I skip, is in my trading journal with charts like these. The full method is in how I trade gold at key levels, and the newsletter sends the levels before each session.
This is my own trading and my own rules, not financial advice. Trading CFDs and forex is high risk, and most retail traders lose money.